These 6 Yoga Poses Will Straighten Your Osteoporosis
Aging occurs subtly - the graying hair, the
softening underbelly of the chin and joint stiffness, all of which
become easier to see and feel over time. Despite the visible signs,
there are also a number of changes that remain completely hidden, and
part of these subtle changes occur in our bones. Getting a bone density
scan once you hit 50 will determine whether you are prone to
osteoporosis or not.
A Deeper Look into Osteoporosis
Osteoporosis is a disorder that thins and weakens the bones, making them
more porous. This could result in fracturing or breaking a bone, which
is when many people unfortunately discover that they have this 'silent'
disease. In fact, osteoporosis in the spine is more often than not
misdiagnosed, with only about a third of cases being diagnosed correctly
- primarily because the pain is mild or mistakenly thought to arise
from something else.
Certain spinal movements should therefore
be avoided, as this could lead to vertebral compression fractures - a
hallmark of a shrinking and stooped posture. Risky movements include
bending forward from the waist, twisting the spine to a point of strain
and doing toe touches and sit-ups.
While many people think of the skeleton as solid and lifeless, it is
actually very much alive, constantly breaking down and renewing itself
in a two-step process called bone remodeling. The rate at which bone
remodeling occurs depends on how much calcium is stored in the bones and
introduced in the diet. Vitamin D intake and exercise, as well as
hormones, also determine how effectively the body uses calcium to build
new bone and prevent bone loss. As a result, osteoporosis occurs from an
imbalance in remodeling - where too much old bone is broken down and
removed, or too little new bone is formed (or both).

And while osteoporosis prevention begins in
childhood (with good health habits, like proper nutrition and
exercise), there is hope - even in the later stages of life. Exercise
plays a key role as we age, as it enables the bones to get stronger by
changing shape and by getting larger in diameter. Progressive-resistance
exercises (such as jogging, jumping or walking) - enabling your body to
move against gravity, are best.
Certain yoga postures are also beneficial. The six poses below help
strengthen the spine, hips and arms and are appropriate whether you have
osteoporosis, osteopenia, or neither. Let's take a look:
Before You Start: Each yoga pose includes important preparatory actions,
making the poses safe and effective. While the prep poses are
important, if you feel secure and strong, continue onto the full pose
that's pictured. And to ensure stability, practice on a mat, carpet or
another surface with good traction.
1. Balancing Table
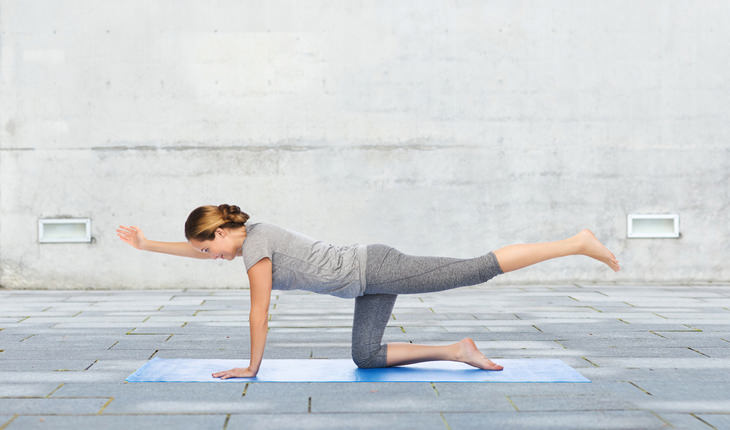
Benefits: Helps to develop balance and
strength in the spine, hips and arms.
Getting Started:
• Start on your hands and knees. Align your hands under your
shoulders, and knees under your hips.
• Keep the sides of your torso lengthened, and keep your abdomen and
hips firm.
• Once you've established a solid foundation, straighten and reach
your right leg back, strongly stretching through your entire leg.
• Keep your toes tucked in. Keep your abdominal muscles strong and
stable.
• Then, when you feel balanced, lift the leg and extend it backward.
A Step Further: If you feel stable in the aforementioned pose, progress
to balancing table by extending your left arm up and forward. You may
keep your leg and arm up just a little, or up to horizontal (as shown in
the image) if you can. Repeat the pose with the opposite leg and arm,
reaching back through your heel, and forward through your fingertips.
Switch and repeat 5 or more times on each side.
Modification: If your knees need a little extra support, place a folded
blanket under it for added comfort.
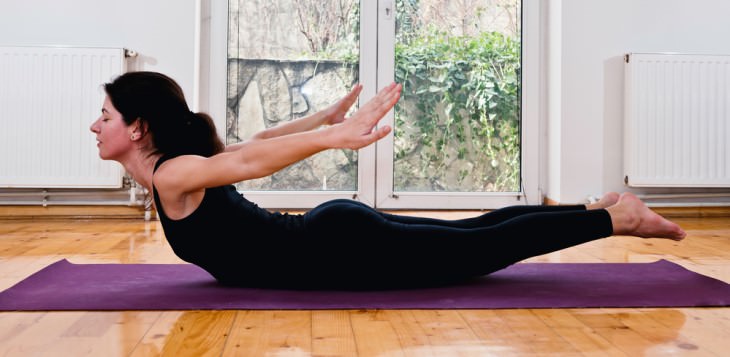
2. Locust Pose
Benefits: Helps prevent rounding of the
upper spine as you stimulate the vertebrae and strengthen the back
muscles.
Getting Started:
• Lie on your stomach. Stretch your arms out to the side in a T, with
palms facing down. Keep your forehead rested on the floor.
• Keep the muscles of your back body (arms, spine and legs) firm.
• Lengthen your tailbone and keep your buttocks toned.
• Draw your shoulder blades in toward your spine and lift your upper
arms away from the floor.
• Feel every part of your body extending away from the center.
• Inhale and lift your arms and head, just a little. Pull your ribs
forward away from your legs.
• Hold the pose for several breaths and rest.
A Step Further: Float up again with your upper body and lift your legs,
stretching them back. Hold the pose for a few breaths or longer and
release back to the floor. Repeat for 3 times.
Modifications: For extra comfort, place a folded blanket under your
torso.
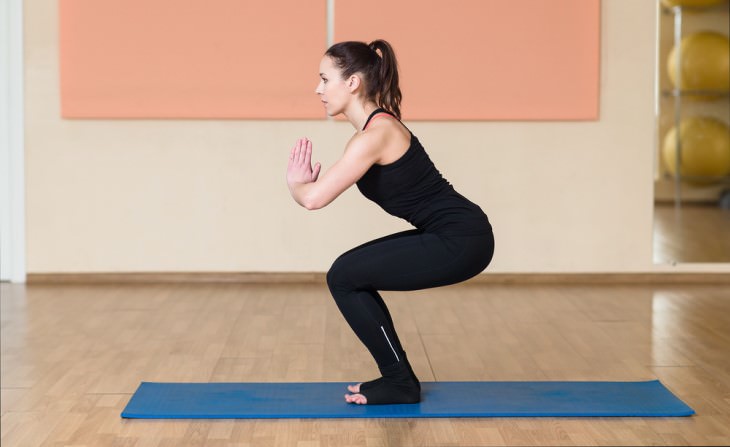
3. Chair Pose
Benefits: Builds strength in the legs,
hips, spine and arms.
Getting Started:
• Sit in a chair, with your feet and knees hip-width apart.
• Lean slightly forward and stretch your arms to the sides, with your
shoulder blades pulling down your back.
• Keep the front of your torso long and your chest, lifted.
• Keep your legs, spine and arms firm.
A Step Further: Inhale, come up off the chair and maintain the pose with
steady strength. Keep your breath smooth and ensure that the knees and
both feet are pointing forward. Your weight should be well balanced
throughout the four corners of your feet. As you hold the pose, keep
your hip bones reaching back and apart. Hold for several breaths and
repeat 3 times.
4. Tree Pose
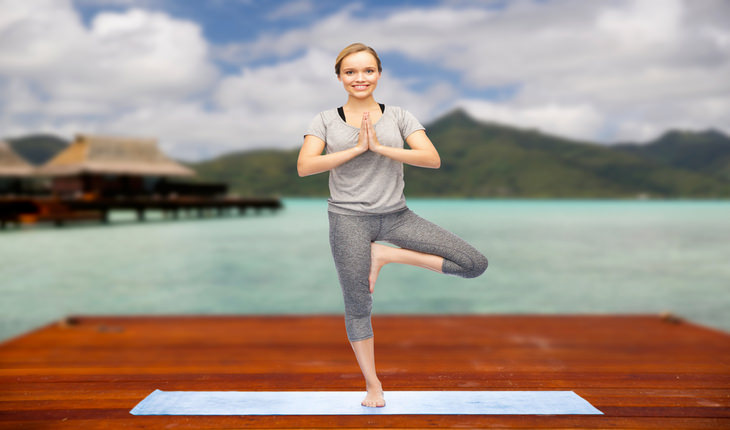
Benefits: Builds strength and better
balance.
Getting Started:
• To help build your confidence, stand with your back near a wall.
• Keep your feet parallel, your toes spread and actively feel the
floor under you.
• Keep the legs straight. Pull your tailbone down and keep your
pelvic floor firm and your lower abdomen lifted.
• With these micro-movements, your pelvis should be directly over
your hips.
• Stretch down through your legs and up through your spine and
through your arms which are extended over your head.
• Bring the sole of your right foot onto the inner ankle of your left
foot, and press it in firmly. If you need to, keep your toes touching
the floor lightly.
A Step Further: When you feel secure, increase the challenge and stand
further away from a wall. You can also try bring your foot higher,
placing it below the knee. Hold for a couple of breaths and repeat on
the opposite leg.
5. Half Moon
Benefits: This side bending pose engages
and opens the hips and teaches balance.
Getting Started:
• Stand near a wall and place a chair parallel to the wall.
• Turn your right foot to face the chair. Bend your right knee,
pointing it toward the toes. For extra stability, place your right hip
lightly against the wall.
• Balance your weight evenly on the four corners of your right foot
and place your right hand or forearm on the chair seat.
• Lift your back foot slightly, keeping your toes touching the floor,
allowing yourself to establish balance on your right leg.
• Place your left hand on your left hip. Inhale, firming your leg
muscles, aligning your torso with the wall. Keep your gaze down to help
you balance.
• On your next inhalation, lift your left leg and stretch it behind
you along the wall. Bringing it up to a horizontal level if you can.
• Breathe fully and smoothly, keeping your hip muscles strong. Keep
your shoulders broad and strongly stretch your left arm up.
A step further: To make the posture a little more challenging, step away
from the wall. If you are able, use a block instead of a chair,
allowing you to enter the pose more deeply. Hold for a couple of breaths
and repeat on the opposite leg.
6. Warrior I Pose
Benefits: Stretches and stimulates your
hips and spine.
Getting Started:
• Place a folding chair about 4 feet away from the wall, facing
outward.
• Stand against the wall and step your right foot forward, bending
the knee, ensuring that your right shin is vertical and your right knee
is in line with the ankle.
• Hold the chair lightly with your hands. Place the left heel up on
the base of the wall with the ball of your foot and your toes on the
floor.
• Inhale and lift up through the spine. Lean your torso forward over
the chair and fully stretch the back leg.
• Reach your tailbone down, and draw up to your lower abdomen. Then
pull your shoulders and head back until they are in line with your hips.
A Step Further: If and when you feel steady, let go of the chair and
stretch your arms vigorously out to the side. Lift your chest as you
stretch through your back leg. Hold for a couple of breaths and switch
sides.
This is only for your information, kindly take the advice of your doctor for medicines, exercises and so on.
https://gscrochetdesigns.blogspot.com. one can see my crochet creations
https://gseasyrecipes.blogspot.com. feel free to view for easy, simple and healthy recipes
https://kneereplacement-stickclub.blogspot.com. for info on knee replacement
https://cancersupportindia.blogspot.com for infor on cancer and health related topics
https://GSiyers
home remedies.blogspot.com is the latest addition to my blogs. I'm
going to add posts there, do give me your valuable feed back on my
blogs. Thanks a lot, take care, be healthy and be happy.


Comments
Post a Comment